When managing projects I use a few different off-the-shelf products. But, it always seems there is some task I need to do that can’t be done efficiently with these tools so I make sure to include MS Excel (Office 365) in my suite of project management utilities. VBA macros within Excel give me the power to complete any custom tasks I require.
I needed to copy a set of folders (an entire recursive tree) to a new location. VBA does not natively include this feature. I searched the web for solutions but it seemed all were either out-of-date (non functional) or simply incomplete (never worked!). So, I thought I’d share my solution built on the VBA scripting.filesystemobject. Hopefully it will help others. Here it is …
Public Sub TestCopyFiles()
    ' Call the recursive copy operation
    CopyFiles "c:\temp\a", "c:\temp\b"
End Sub

Public Sub CopyFiles(ByVal strPath As String, ByVal strTarget As String, Optional ByVal basePath As String, Optional ByVal baseTarget As String)
    If basePath = "" Then basePath = strPath
    If baseTarget = "" Then baseTarget = strTarget
    Set FSO = CreateObject("scripting.filesystemobject")
    ' First loop through files in this folder
    For Each nextFile In FSO.getfolder(strPath).Files
        fullTargetPath = strTarget + "\" + nextFile.Name
        mkdir (strTarget)
        ' Copy one file
        FileInFromFolder.Copy fullTargetPath
    Next
    ' Next loop through folders in this folder
    For Each nextFolder In FSO.getfolder(strPath).SubFolders
        nextStrTarget = baseTarget + Right(nextFolder, Len(nextFolder) - Len(basePath))
        mkdir (nextStrTarget)
        CopyFiles nextFolder.Path, nextStrTarget, basePath, baseTarget
    Next
End Sub

Private Sub mkdir(folder As String)
    ' Create a folder if it doesn't exist
    Set FSO = CreateObject("scripting.filesystemobject")
    On Error Resume Next
    FSO.CreateFolder (folder)
    On Error GoTo 0
End Sub
As a recent cross-over user of Subversion to Git, I occasionally need a refresher of some command-line git operations … and I find myself searching the web. So, I created this list in a single, easy to locate post. Here is a list of Git operations I find most useful. Listed in order of a typical workflow. Hence more interesting (and more easily forgotten) operations are listed at the end.
Both Hyper-V and Virtual Box are excellent virtualization tools. Unfortunately, they compete for the BIOS virtualization feature. I’ve been using the HoloLens emulator recently which requires Hyper-V.
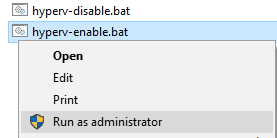
I created some simple batch files to easily enable/disable Hyper-V as I move to/from the HoloLens emulator. Create two new files (add the contents specified below) , right-click and run as Administrator, a reboot is required.
hyperv-enable.bat
@echo off
echo "NOTE: you must run this script at administrator level"
bcdedit /set hypervisorlaunchtype auto
echo "press enter to reboot ..."
pause
shutdown /r
hyperv-disable.bat
@echo off
echo "NOTE: you must run this script at administrator level"
bcdedit /set hypervisorlaunchtype off
echo "press enter to reboot ..."
pause
shutdown /r
to switch hyper-V on/off simply right-click on the bat file and select ‘run as administrator’ … after a reboot, the hyper-V service will be updated.
Creating new C# scripts in Unity3D is a simple process with a click of a mouse; although I find myself updating the default behavior script to match my coding preferences each time I create a new script.
Here’s how I update the default script to simplify my development process.
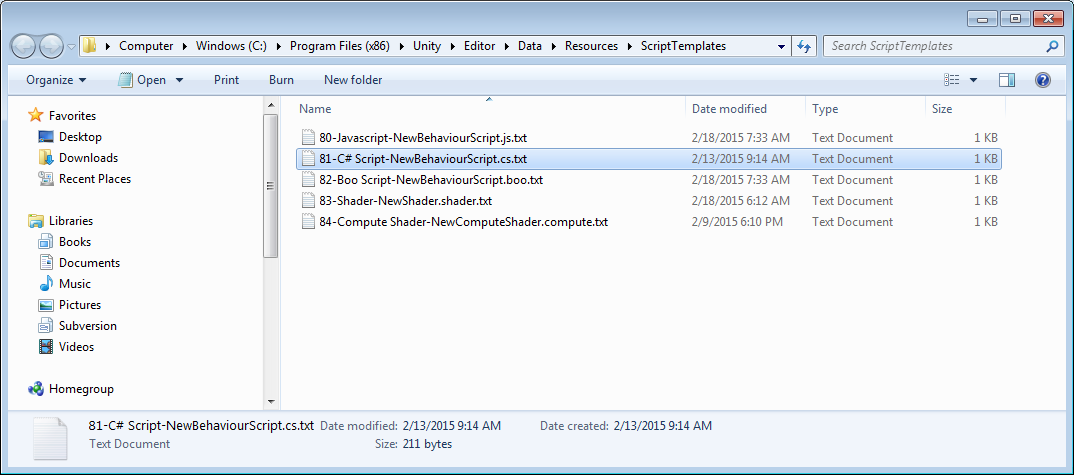
Browse to the Unity3D installation folder (typically named “C:\Program Files (x86)\Unity\”) and locate the sub-folder “Editor/Data/Resources/ScriptTemplates”
Here you will see the template files used to create new scripts. On my system I have five templates: javascript, C#, Boo, shader, and computer shader. I am interested in the C# template.
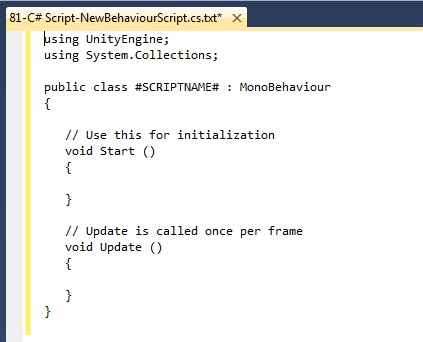
Open the file named “81-C# Script-NewBehaviourScript.cs.txt”
Update the layout file
Save the file
Now, when I create a new C# script in Unity3D it uses my preferred coding style layout.
Note: if you re-install Unity3D then you will need to update the layout file again.
Unity3d is an excellent cross-platform tool for developing interactive content. Unfortunately some desirable work-flow features are just not available. One such feature is the ability to change the default Project Location where all new Unity projects are saved. With Unity, I find myself creating new projects quite often to test new features and ideas. Being able to set a custom default Project Location would be a great time-saver so I would not have to drill-down into a file dialog to locate a specific folder.
While searching for a solution I found many otherslooking for the same feature. Unfortunately, no solutions were available. I found one mention of a registry key which could be altered but that did not work. I used the Microsoft Process Monitor to view registry and file access by the Unity process but I never saw any interesting data being read.
After some quick tests I found that Unity always uses the personal documents folder. The personal documents folder is located by Unity using the Microsoft SHGetFolderPath API. By default, Unity saves new projects under a folder named “New Unity Project (X)” under your personal documents folder. So, the task is to get Unity to read a different value for the personal documents folder.
The following details how to update Unity running on Windows. These steps are not valid for Unity running OSX or Linux.
Instructions:
In order to get Unity to display a custom Project Location folder when you select File | New Project … you must update a value in the Windows registry. To accomplish this, create a simple Visual Basic script to update the personal folder name, launch Unity, then revert the personal folder name when Unity is closed. Here are the step-by-step instructions …
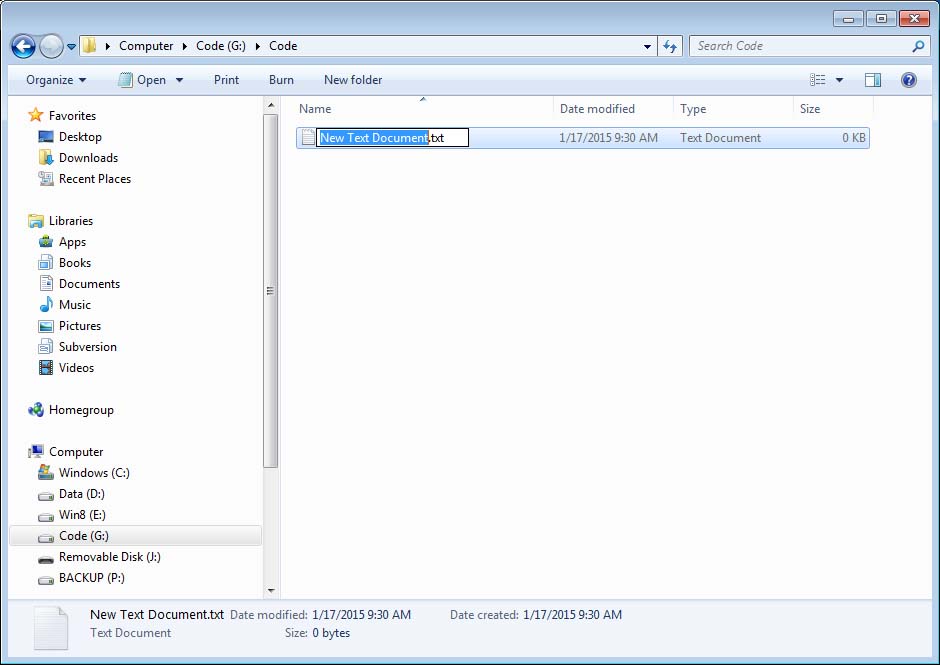
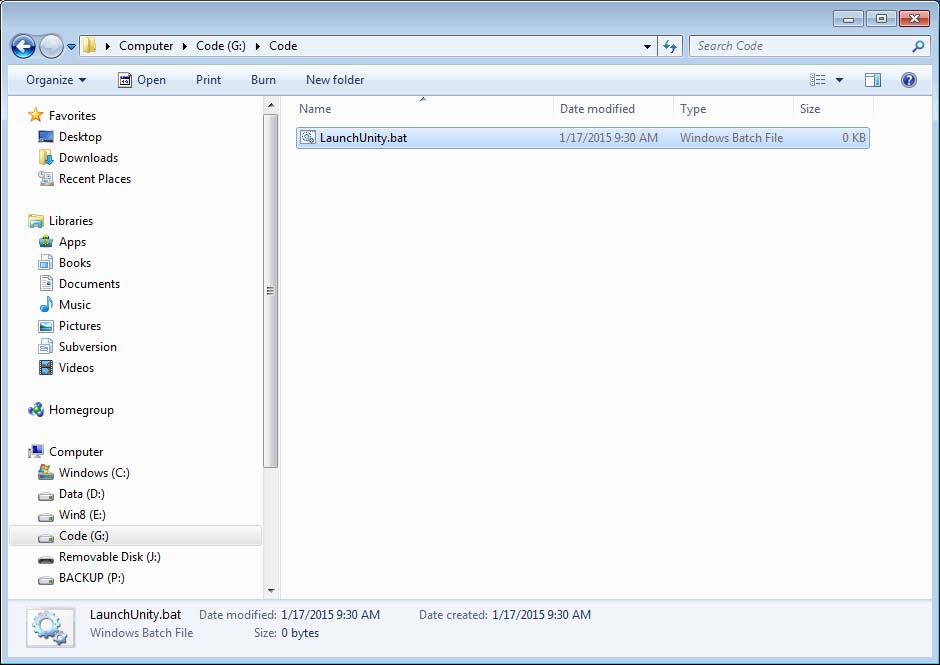
Create a new empty document (e.g. within Windows Explorer Right-click New | Text Document)
rename the file LaunchUnity.vbs
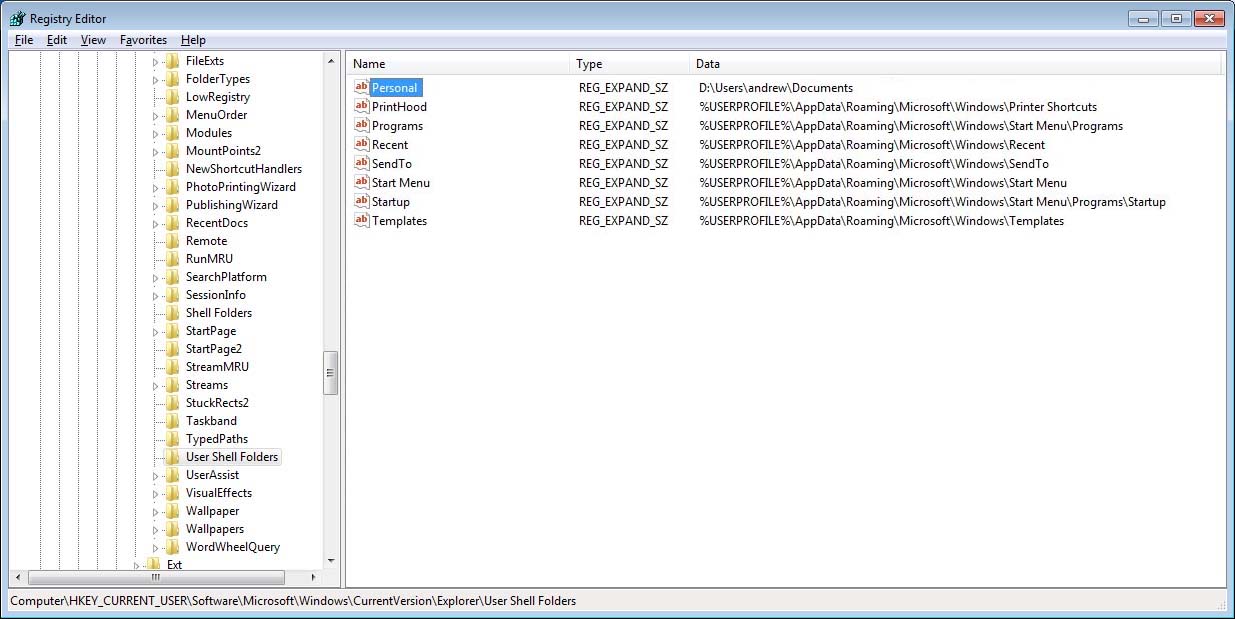
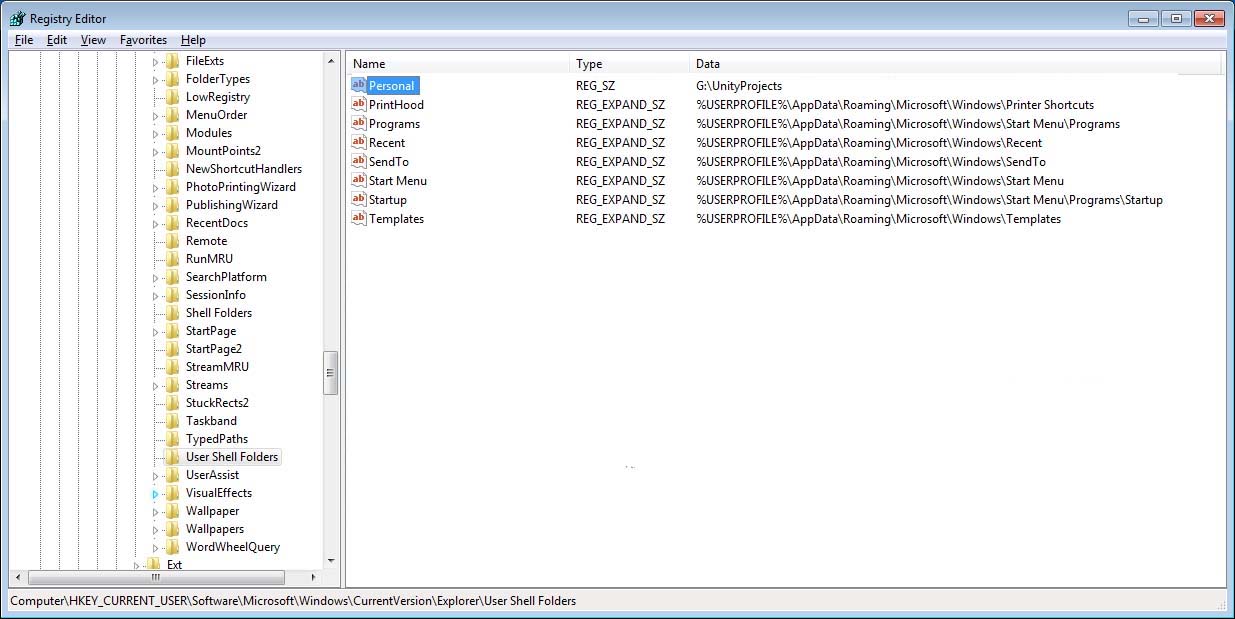
Open the Windows registry (e.g. regedit.exe) and browse to the key named HKEY_CURRENT_USER\Software\Microsoft\Windows\CurrentVersion\Explorer\User Shell Folders. Find the value named Personal. This is the value returned by the Microsoft SHGetFolderPath API. It should be of the form C:\Users\<yourname>\Documents.
Make a note of this value. You will use it later to update your Visual Basic script.
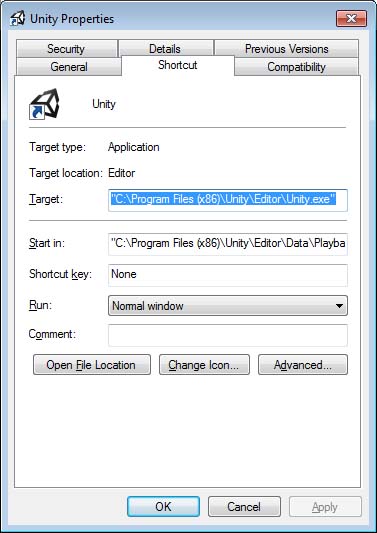
Now, right-click on your Unity3d icon and select Properties. Select the Shortcut tab and locate the Target textbox which contains the path to Unity3d on your system. It should be of the form “C:\Program Files (x86)\Unity\Editor\Unity.exe” but can vary based on where you installed Unity and if you are running 32-bit or 64-bit Windows.
Make a note of this value. You will use it later to update your Visual Basic script.
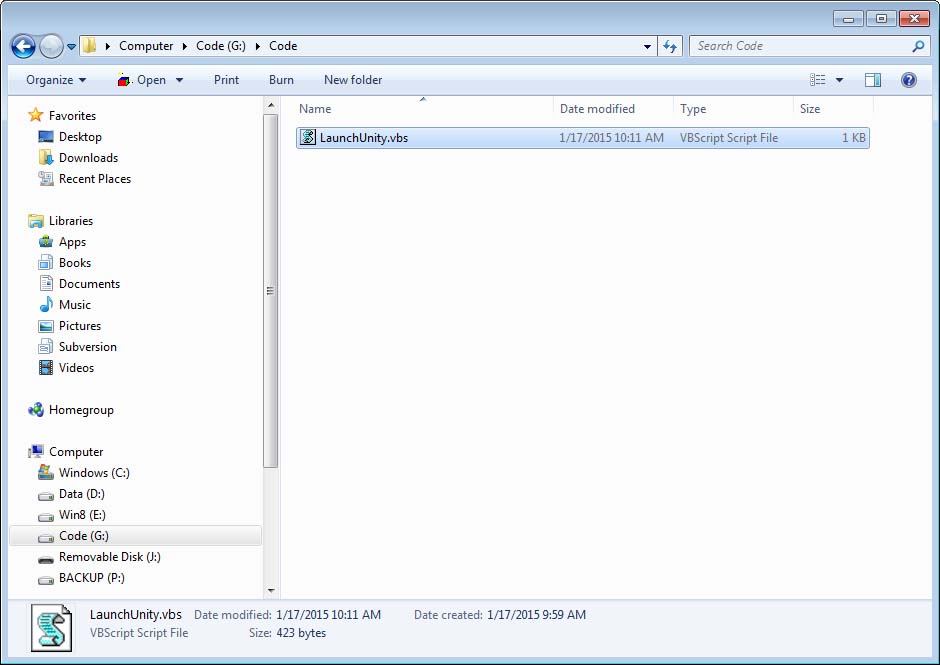
Now create the Visual Basic script to update the folder name and launch Unity. Right-click on the “LaunchUnity.vbs” file you created and select Edit.
Copy and paste the following Visual Basic script code into the LaunchUnity.vbs file
Replace the three strings “C:\YOUR\PROJECT\FOLDER”, “c:\Program Files (x86)\Unity\Editor\Unity.exe”, and “C:\YOUR\PERSONAL\FOLDER” with the default path you want to save Unity projects, the path to unity.exe, and your existing personal folder respectively. Warning: make sure you do not use a trialing \ on the paths or that will break the vbs script.
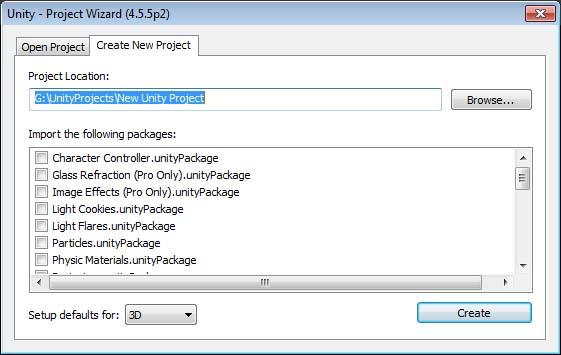
For example, here is my final vbs script using “G:\UnityProjects” as my custom project location and “C:\Users\andrew\Documents” as my existing personal folder.
When you want to use the new custom project location, simply launch Unity via the new LaunchUnity.vbs script you just created.
Verify the custom project location
Launch Unity via the LaunchUnity.vbs script you just created. Unity should launch as usual. If it does not then go back and verify you followed all steps correctly.
From Unity, select File | New Project … and you should see your new custom project location. Easy!
While Unity is running, you can view the Personal key in Windows regedit.exe. Press F5 in regedit to refresh the view. You will notice that it is set to you custom folder name.
When you close Unity, the Personal key will automatically revert back to its previous value.
Wrap up:
So, when ever you want to create a new project in Unity, simply open Unity with the LaunchUnity.vbs script. As a benefit, once the new project is created, Unity will automatically close itself and re-open so the Personal folder will be reverted back to normal after your new project is open!
Pros:
Simplify new project creation in Unity3d
Guarantee all new projects are placed within your developer storage
Easy one-click launch of Unity3d configures the project location folder and terminating Unity3d automatically reverts your personal folder to its default value
Since Unity automatically closes and re-opens after creating a new project the Personal folder will be reverted automatically after creating a new project
Cons:
All programs requesting the Personal folder via the Microsoft SHGetFolderPath API while Unity3d is running will get the custom folder you defined for Unity3d. You can shut-down Unity to automatically revert the original folder name
Occasionally I have a use for changing variables to test certain features when working on a project. In these instances I like to use a breakpoint to test values rather than recompiling with some test code or manually breaking and setting a value, I like to use the breakpoint itself to set the variable. This is fairly easy to do.
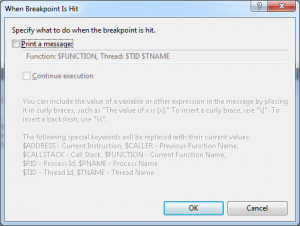
To create a breakpoint that sets a variable. Create a breakpoint where you want your vairable to be set in code in Visual Studio. Right click on the breakpoint and select the “When Hit…” option. You will see something like the figure below. Select the “Print a message:” checkbox.
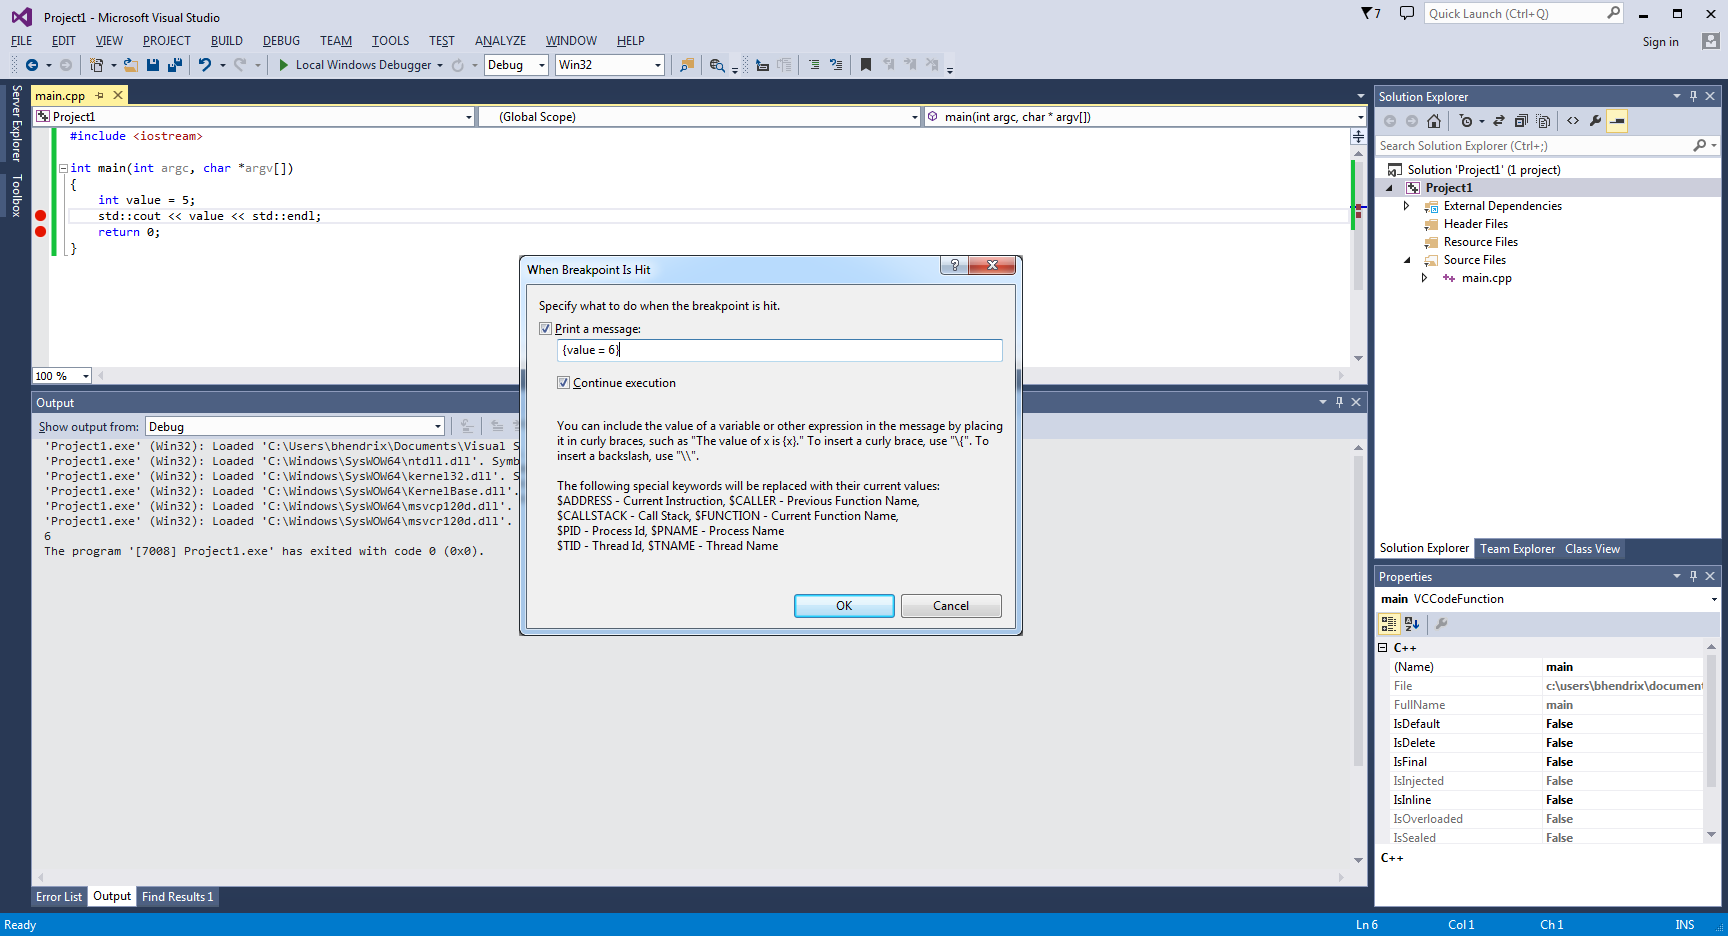
Delete the contents of the edit box and place the code that would set the value like the example below. When you are finished make sure the assignment is wrapped in curly braces.
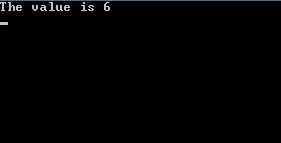
You can leave the continue execution box checked depending on your situation. Most of the time I leave this checked, because I like to have the variable set without me having to stop what I’m doing and intervene with the debugger. Below you can see the output from the simple program. The value has changed from 5 to 6.
You can set multiple variables at once by putting each assignment in separate curly brace blocks. This is a great solution to test certain scenarios without having to fiddle with recompiling or stopping execution to set the value manually in the debugger.
One thing to note is that this is extremely slow and it will print the value you set into the debug window in visual studio. So doing this in a tight loop is probably not recommended. Currently I use a breakpoint that sets three variables differently between local debugging and remote debugging configurations.
The amazing global economy opens many doors to your software product. Localizing your software in different languages will improve its success. While many people whose primary language is not English can probably trudge their way through your non-localized English software, a localized version of your software will always be a benefit; both to your customers and your product viability.
The task of localizing software varies based on the platform (iOS, Android, Windows desktop, Linux, etc) as well as the language being used (Java, C#, C++, Objective C, etc). Many old-school software engineers might recall a time when localization was designed and coded in-house; typically once, and then that software code was re-used on other projects. Regardless, the process was typically tedious and prone to bugs and glitches. Fortunately, today, the major development platforms offer simple localization features built-into their developer stack. This post will discuss localization of Windows applications using C#. View this other post regarding localization in Java on Android.
The task:
Okay, so you just created a cool Windows application in C# and now you’ve been tasked with localizing it into fourteen different languages. After staring at your non-localized application project in Visual Studio and searching the Internet you probably have some confusion about how difficult localizing your project actually is. I’ve seen many people obfuscate the simplicity of the task. There are various methods, but if you follow some simple rules, the process can be very painless. Adding new languages to a localization-ready project at any time in the project cycle is a simple process too!
Step by step:
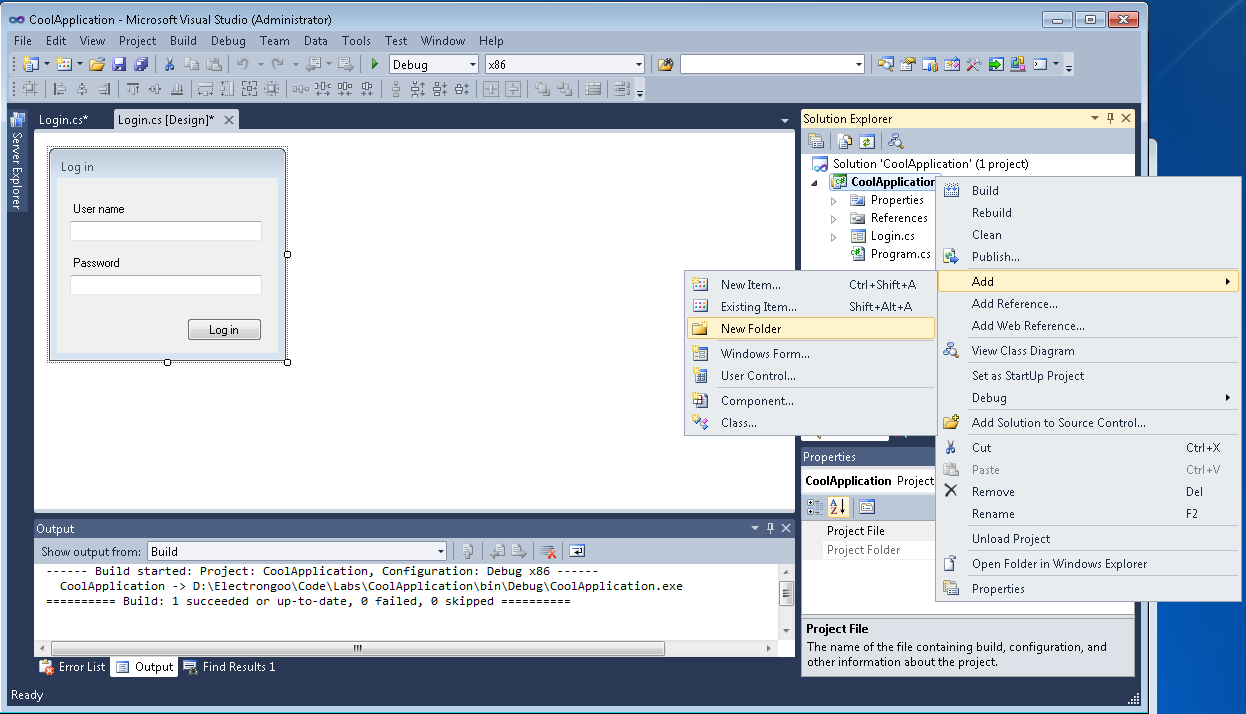
Open your project in Visual Studio. From the solution Explorer right-click on you project name and select Add | New Folder and name the folder Resources
Create resource folder in Visual Studio
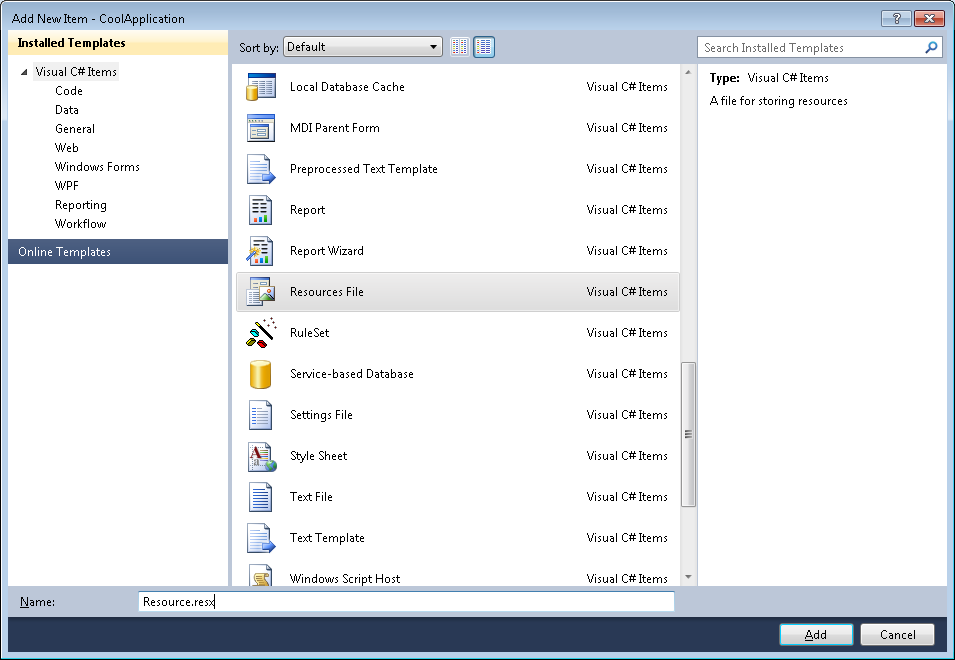
From the Installed Templates section, select Visual C# Items and then select Resource Files. This first resource file will contain your default native English resources strings. Name the file generically resources.resx to simplify the process.
Select Resource Dll to add to project
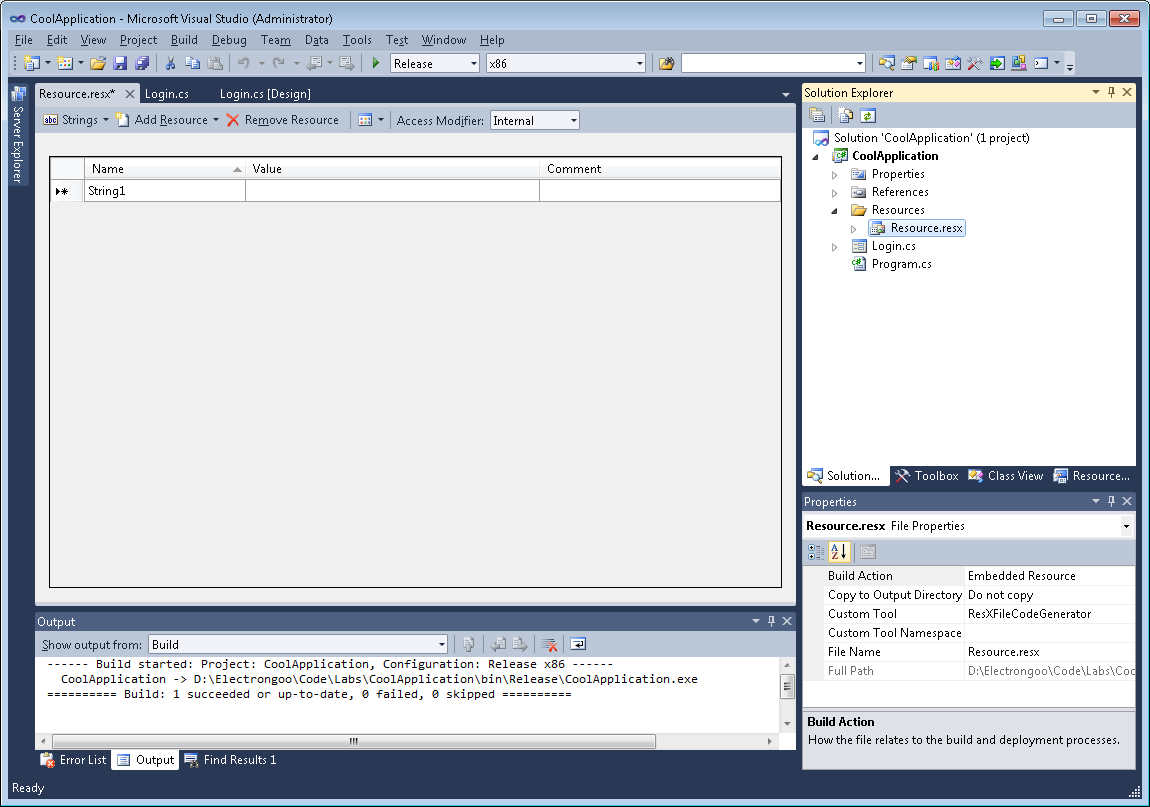
A new resource file will be created and will be displayed in Visual Studio ready for you to add the resource strings.
New native English resource file created
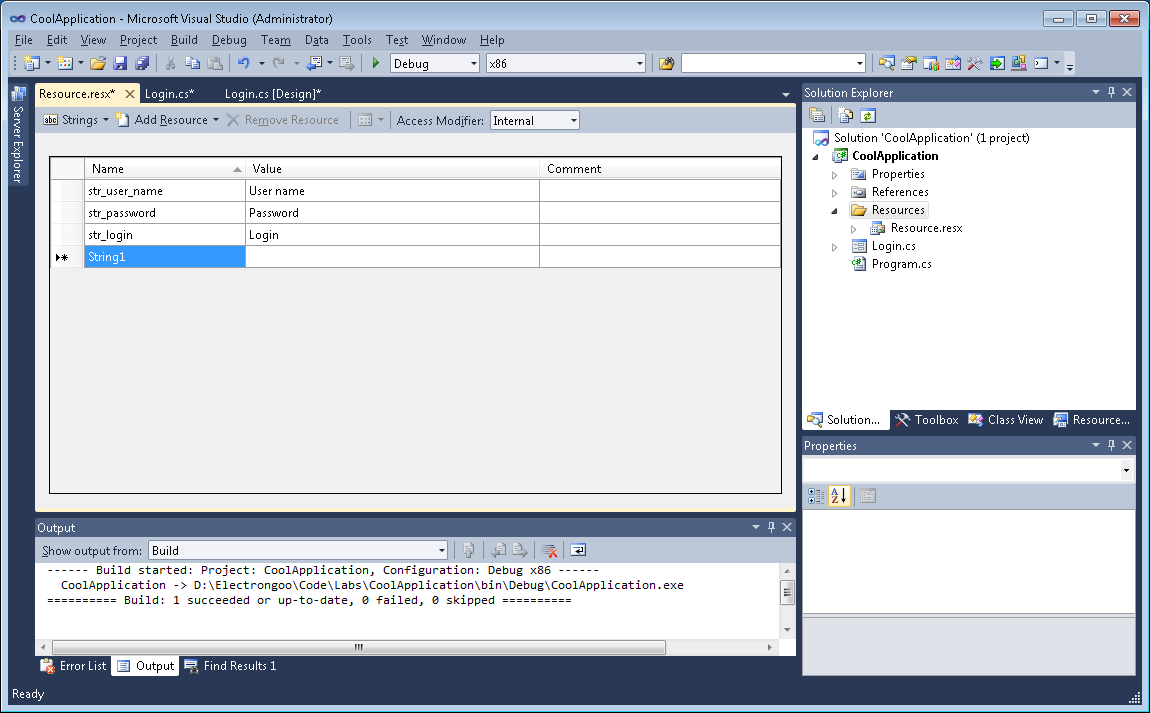
Enter each of the strings used in your project in the resx file. In the Name column enter a unique name that you can reference the string from within your code. I recommend prefixing each of your string names with str_ to make your source code easier to read. Enter the string as it will appear to the user in your software under the Value column. You will do this for each string in your project. Don’t worry if you don’t enter all of the strings at this time, you can always return and enter more strings. The key to success here is to ensure that your first resource file is complete, and contains ALL strings, before you begin to create additional resource files. You can add new strings at any time but make sure you add each new string to ALL resx files you create.
Native English resources added to resx file
From the Solution Explorer, open one of your dialog files. Note, you will obviously have multiple dialog files for a single project; you will need to process each file. In the Design layout window make sure the dialog is selected then go to the Properties page and select the Events button (this will appear as a lightning bolt).
Add the Load() event handler to each dialog resource
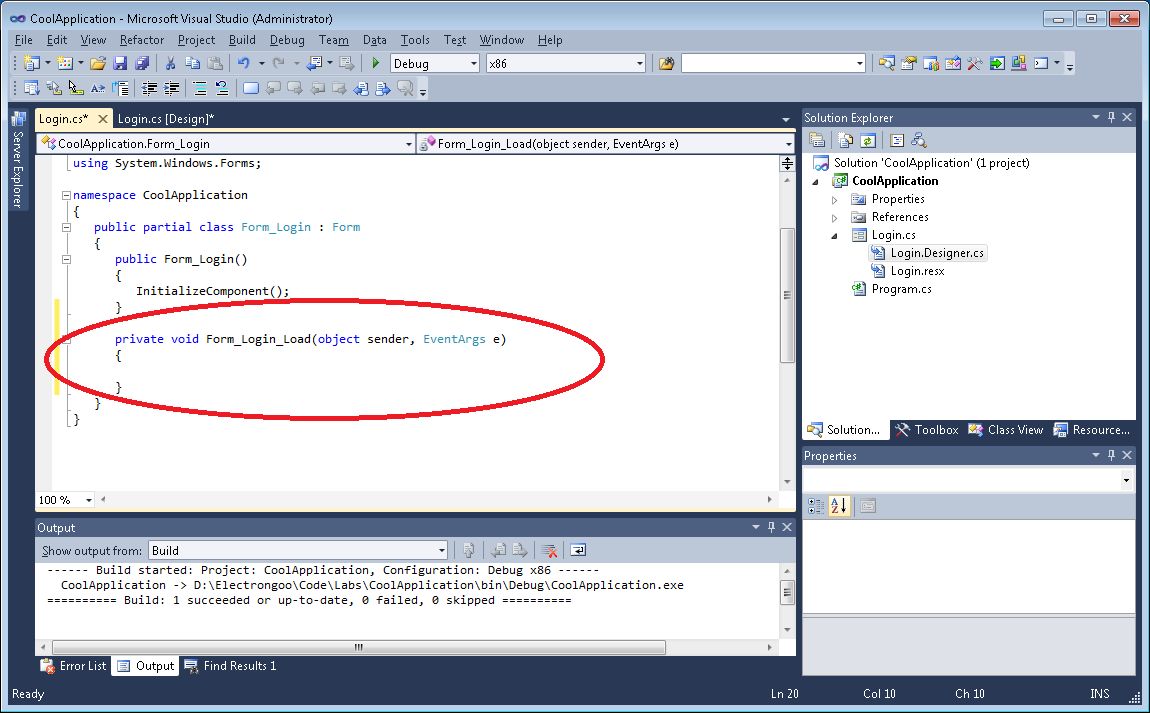
Scroll down to the “Load” event and double-click. The wizard will automatically create a new Load function, if it does not exist, which will be called by the Windows framework when the dialog is loaded but before it is displayed to the user. This is the preferred Windows event to handle updating resources in dialog boxes.
Event handler automatically added
Now, within the Load() event handler, set the Text field for each of the controls within your dialog to a string you created in the resource file. You will use the Resources.Resource class to resolve each string
Now, simply repeat the steps above for each dialog in your project. If you do this during initial development of your project it makes the task much easier. At this point, you have a fully ready to localize project.
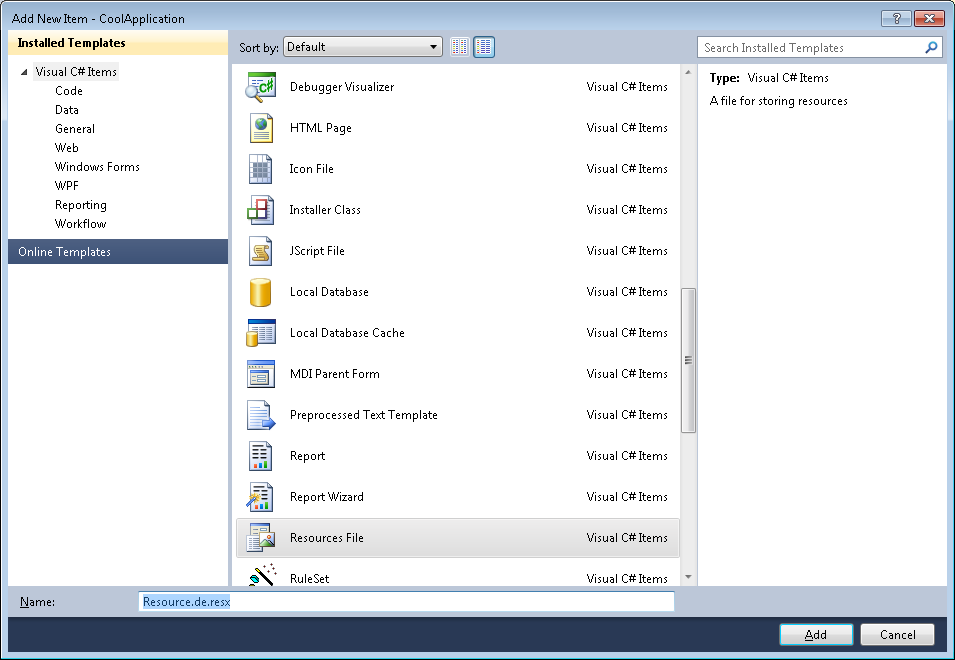
Now that you have all your dialogs using resources files and you have a base native English resource file, you can start creating new resources files; one for each language you want your project to support. The steps are similar to creating the base English resource file above. Right-click on the Resources folder and select Add | New Item then select Resources File and name the file based on the language being added. You must use the filename convention resources.XX.resx where XX is the two-letter language identifier. Doing so will greatly simply the localization process. For example, to create a German resource file create the file named Resource.de.resx and to create a French resource file create the file named Resource.fr.resx.
Create a new resource file for localized text
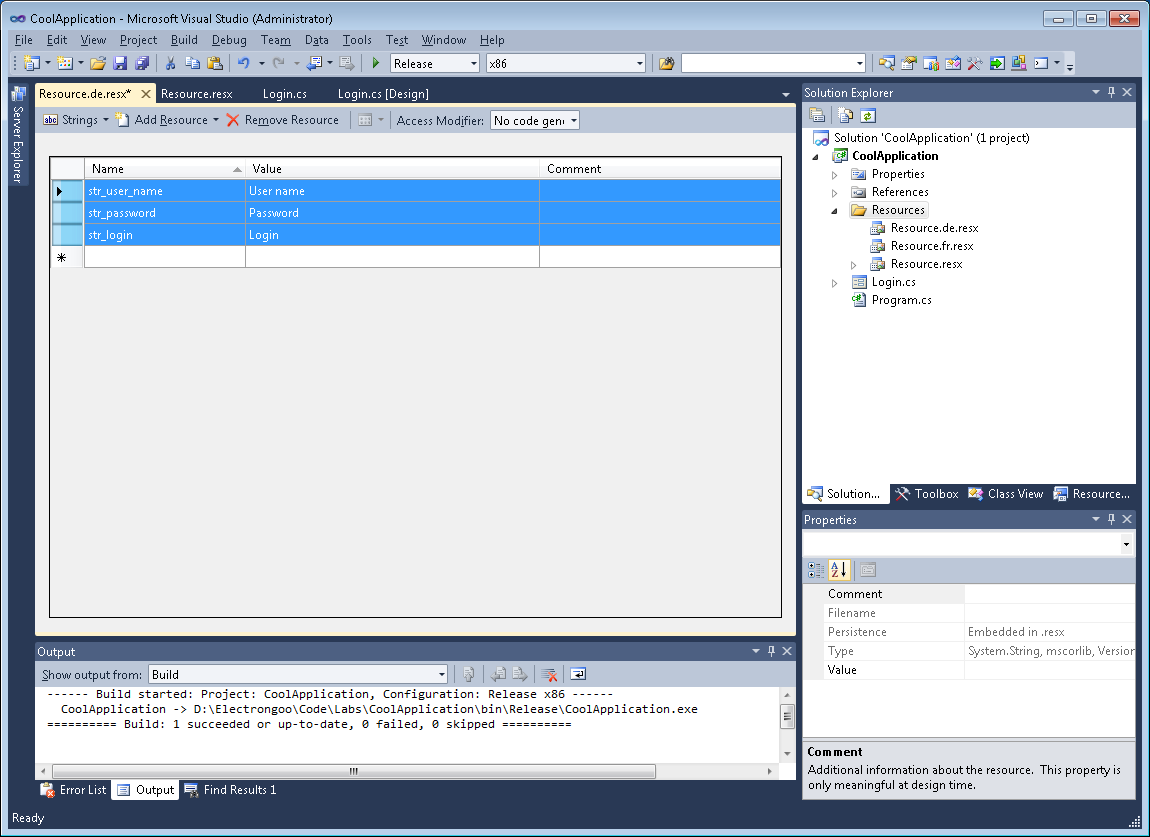
Now you have a new resource file to contain the strings for a new language. Now return to the base native English Resource.resx file and click on the box in the upper-left corner (or press Control-A) to select all of the strings and press Control-C to copy the strings to the Windows clipboard. Return to the newly created Resouce.de.resx file and press Control-V to paste the strings from the Windows clipboard into the new resx file.
Copy existing English resource strings into the new resource file
It’s that simple! Now, you have a localization-ready project which supports two languages. You can easily add new languages by creating new resources files under the Resources folder at any time. The key is to use the naming convention Resource.XX.resx as discussed above.
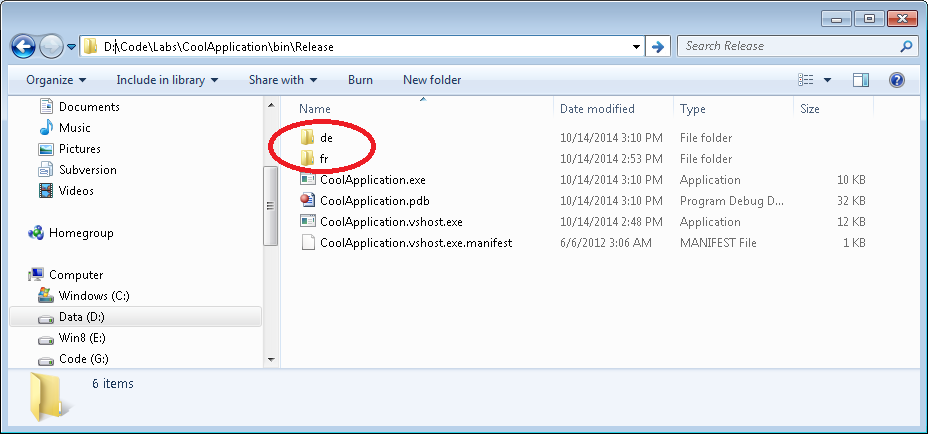
When you build your project, the resource files will automatically be created under subfolders named XX, where XX is the language code of the Resource.XX.resx file you created.
Language folders automatically created during Visual Studio build
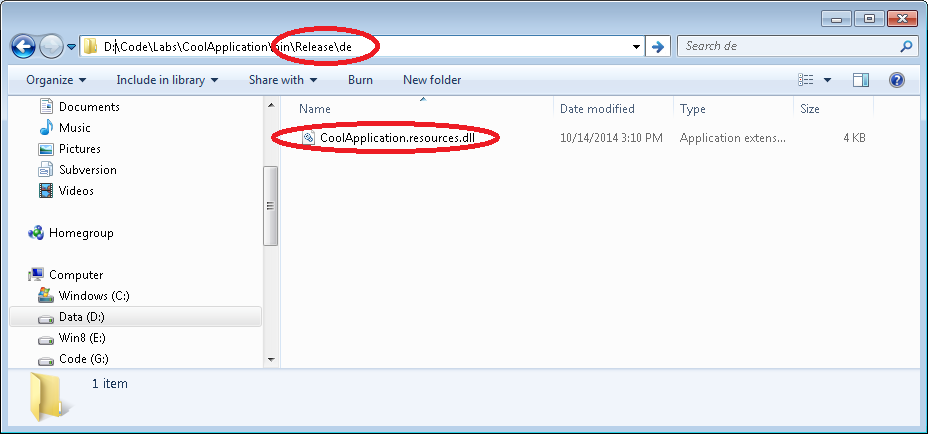
Each subfolder will contain the resource strings for the specific language
Language dll located in its language folder
Finally, provide the Resource.XX.resx files you created to your localization provider such as inwhatlanguage.com for localization. When the resx files are returned to you, simply drop them into your project overwriting the previous temporary English versions and rebuild your project.
Make sure your project installer creates an identical folder structure under the folder containing your executable (this folder structure should look identical to the folder created by Visual Studio after a build). When you project starts it will automatically search that folder structure for a supporting language id. If the resource dll for that language exists then the resource file will be loaded. If it does not exist then the default native English resource file will be used.
Debugging:
Debugging new localization files is simple. Simply add the following lines of temporary code to the primary Load() event handler in your project
using System.Globalization;

private void Form_Login_Load(object sender, EventArgs e)
{
   Thread.CurrentThread.CurrentCulture = new CultureInfo("de-DE");        //e.g. de-DE   zh-CN   ja-JP
Set the CultureInfo string specified in the constructor to the language-region code you wish to test. For example, to test German in Germany use “de-DE” and for Chinese in Hong Kong use “zh-HK.” A full list of language and region codes can be found here. Rebuild and run your project and the strings from the specified locality will be displayed automatically.
Tips:
Even if you don’t have current plans to support localization, always build new projects targeted for localization by moving your text strings into a resource file and use the Resources.resource class to update all your user visible components
Always name resource files with the format Resource.XX.resx (where XX is the two-letter language id) to simplify the build process
Make sure your first native English resource file contains all of the strings before creating localized resource files. Adding new (or forgotten) strings to each localized resource file can be a painful repetitious task prone to errors
In a perfect software development environment, an engineer can design, develop, and debug on a single system. Conveniently, building and debugging a project can be accomplished a single key stroke: for example, pressing F5 in Microsoft’s Visual Studio. Unfortunately, many projects do not allow for local debugging. Some examples of this:
Resolving bugs which only occur on specific systems
Developing for a project which only runs on an operating system which is not a beneficial development system (e.g. Windows Home Server or simply an older version of Microsoft Windows such as Windows Vista or Windows XP)
While most software projects allow for simplified build and debug options via a software test-harness project or limited project build. There are typically times when remote debugging is required. Fortunately, Visual Studio offers a very robust remote debugger feature.
Requirements:
Microsoft Visual Studio 2013, 2010, 2008, or 2005 (VS Express not supported)
Remote Tools for Visual Studio
A host (development) PC running Windows and Visual Studio
A target (debug) PC running Windows
Your software project, symbol files, and source code
One-time setup of host system:
Setting up the host system is fairly easy. Simply install Visual Studio, which should already be installed if you’re using your existing development system then configure the firewall to allow network communication between the host and the remote systems. Here are the three typical firewall options you have:
If you do not have a firewall installed then there is nothing to do.
If you are running a third-party firewall such as Norton Internet Security then simply disable the firewall temporarily during remote debugging. This is my personal preference since I rarely remote debug and I prefer not to permanently open ports in my firewall. I accomplish this by right-clicking on Norton Internet Security located in the tray icon and select Disable Smart Firewall and then select “15 minutes.” This usually provides me enough time to debug and it also automatically re-enables the firewall in case I forget. You can always disable the firewall for extended times if debugging is taking longer than expected
If you’re running Windows built-in firewall then type “firewall” in Windows search to locate and run “Windows Firewall with advanced security” then create the following rules
Windows firewall utility
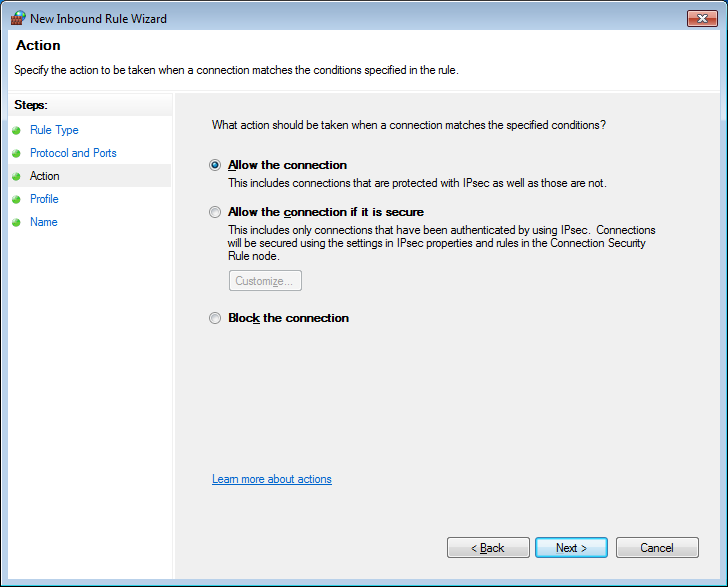
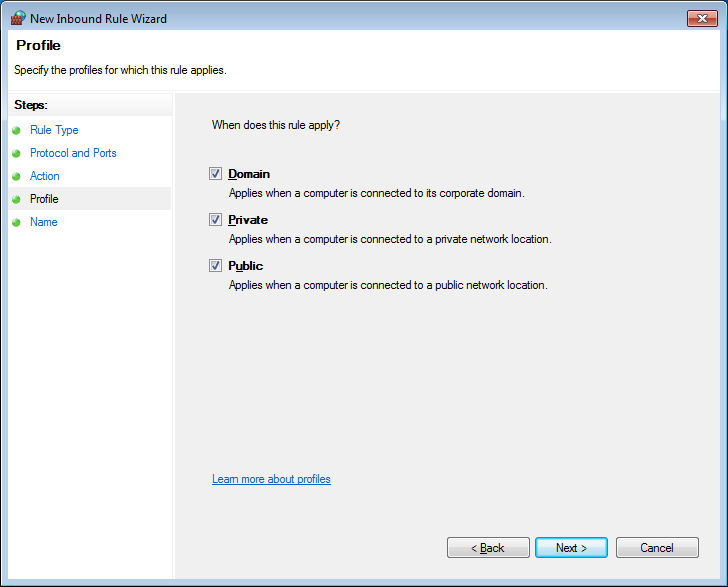
Allow Visual Studio application: Inbound Rules (on left side) | New Rule (on right-side) | Program | This program path | locate the path to your Visual Studio dev e.g. %VSInstallDirectory%\Common7\IDE\devenv.exe | Allow the Connection | Domain=checked, Private=checked, Public=checked | provide any rule name you wish
Allow DCOM services on port 135: Inbound Rules (on left side) | New Rule (on right-side) | Port | TCP | Specific Local Ports = 135 | Allow the Connection | Domain=checked, Private=checked, Public=checked | provide any rule name you wish
Allow IPSec services on ports 500 and 4500: Inbound Rules (on left side) | New Rule (on right-side)| Port | UDP | Specific Local Ports = 500,4500 | Allow the Connection | Domain=checked, Private=checked, Public=checked | provide any rule name you wish
See the “One-time setup of remote system” below for example screen-shots of the firewall wizard. Now your host system is all configured. Now it’s time to configure the remote system.
One-time setup of remote system:
The initial setting up the remote system involves opening ports in your firewall for communication and providing privileges to the Remote Debugging Monitor utility.
First, locate the Remote Debugging Monitor utility. This is included with the Visual Studio install set. Two versions of the utility are included, one for debugging on 32-bit applications (x86) and a second for debugging 64-bit applications (x64). The utilities are found on the installation drive under the Visual Studio install folder (for example, Visual Studio 2010 can be found here %SystemDrive%\Program Files (x86)\Microsoft Visual Studio 10.0\Common7\IDE\Remote Debugger). If you do not have this folder in your Visual Studio install-set then you can re-install Visual Studio and select “All Components.”
The two versions of the Remote Debugging Monitor will be located in their x86 folder (for 32-bit) and x64 folder (for 64-bit). For example, for Visual Studio 2010:
C:\Program Files (x86)\Microsoft Visual Studio 10.0\Common7\IDE\Remote Debugger\x64
C:\Program Files (x86)\Microsoft Visual Studio 10.0\Common7\IDE\Remote Debugger\x86
Which version of the utilities do you need? You’ll need to install the version which matches the “bit-ness” of the application you are debugging. Examples:
Debugging a 32-bit application on a 64-bit target system: use x86
Debugging a 32-bit application on a 32-bit target system: use x86
Debugging a 64-bit application on a 64-bit target system: use x64
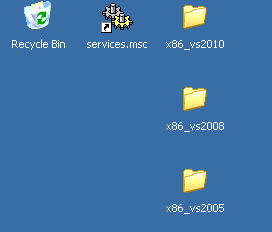
Copy the entire utilities folder (either “x86” or “x64”) from the Visual Studio folder to a folder of your choice on your remote debugging system. I prefer to copy the folder directly to the Desktop and then rename the folder to identify the version of Visual Studio the tools came from as well as the “bit-ness” (for example x86_vs2010, x64_vs2013, x86_2005, etc).
desktop shortcuts
Configuring the firewall is very simple by letting the Microsoft msvsmon.exe utility configure itself on first-run. To do so, launch msvsmon.exe on the remote debugging system. You will be prompted, “do you want to automatically configure the firewall?” Select Yes, and all the ports and privileges will be configured for you. If you find this is not working or you want to configure the firewall manually then follow the following steps (otherwise continue to the next section, “Configuring a debug session”). Here are two common options to configure the firewall on the remote system:
If you do not have a firewall installed then there is nothing to do.
If you’re running Windows built-in firewall then type “firewall” in Windows search to locate and run “Windows Firewall with advanced security” then create the following rules
Windows firewall utility wizard
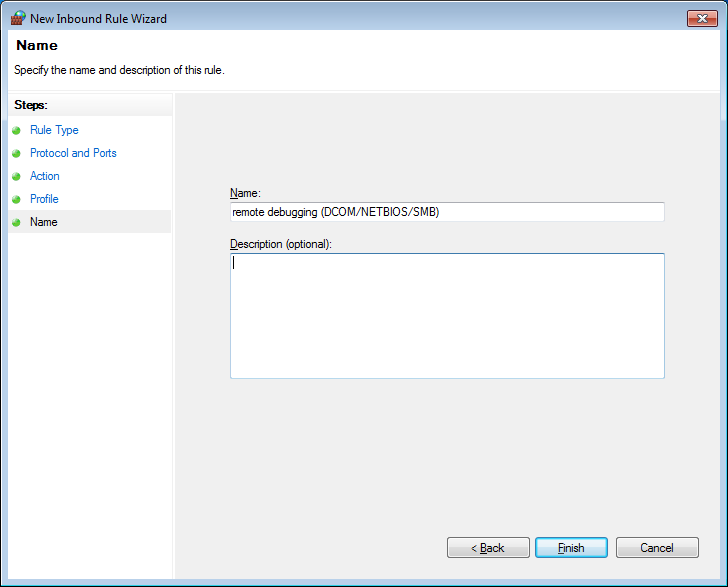
Allow Remote Debugging Monitor application: Inbound Rules (on left side) | New Rule (on right-side) | Program | This program path | locate the path to the Remote Debugger Monitor e.g. msvsmon.exe | Allow the Connection | Domain=checked, Private=checked, Public=checked | provide any rule name you wish
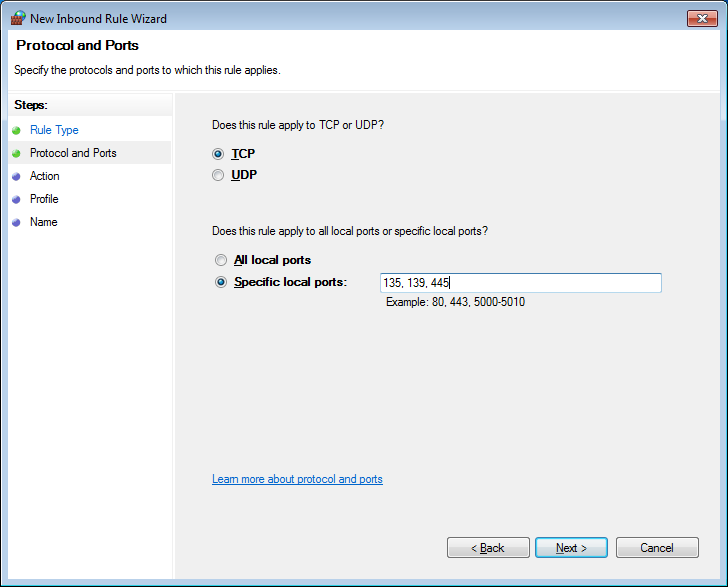
Allow DCOM/NETBIOS/SMB services on port 135, 139, 445: Inbound Rules (on left side) | New Rule (on right-side) | Port | TCP | Specific Local Ports = 135,139,445 | Allow the Connection | Domain=checked, Private=checked, Public=checked | provide any rule name you wish
Allow NETBOIS services on ports 137 and 138: Inbound Rules (on left side) | New Rule (on right-side)| Port | UDP | Specific Local Ports = 137,138 | Allow the Connection | Domain=checked, Private=checked, Public=checked | provide any rule name you wish
Allow IPSec services on ports 500 and 4500: Inbound Rules (on left side) | New Rule (on right-side)| Port | UDP | Specific Local Ports = 500,4500 | Allow the Connection | Domain=checked, Private=checked, Public=checked | provide any rule name you wish
Now your remote debugging system is all configured. It’s time to setup a debug session.
Configuring a debug session:
Now that the one-time configuration of the host system running Visual Studio and the remote debugging system running the Remote Debugging Monitor is complete, you can setup a debugging session quickly and easily.
The general steps for starting a new debug session are:
Build your project via Visual Studio (this ensures the latest code, symbols, and executable files are all in-sync and available)
Copy the executable files and symbol files to the remote system
Register/install all executable files necessary to your project on the remote system
Launch the Remote Debugging Monitor utility on the remote system
Launch your application on the remote system
Attach the Visual Studio debugger on your host system to your running application on the remote system
You will repeat these six steps every time you create a new debug session. I recommend automating steps 2 – 5 via a batch file or Power Shell script. Not only will automation make the setup process quick, it will also make it less error-prone. As an additional side-benefit you can use the script as a source of documentation; making it easy to recall what files must be installed, registered, and started before a debug session for your specific project.
Each script you create will be unique to each project. Scripts will have commonality since they tend to accomplish the same actions (stopping services, copying files, registering services, starting the remote debugger, etc). Here is an example of a script I use after building my project with Visual Studio. It takes care of all the heavy lifting; making sure my project is configured on the target debug system.
echo on

REM *** stop my service if it’s currently running
net stop "Jojo Manager Service"

REM *** unregister the service with Windows
"C:\Program Files\Jojo\jojoserve.exe" /UnRegServer

REM *** copy all project files from host development system
REM *** to the local debug system. Including debug PDB symbol files
copy /Y "\\MyShare\Code\Projects\Jojo\jojoserve\Debug\jojoserve.exe" "C:\Program Files\Jojo\"

copy /Y "\\MyShare\Code\Projects\Jojo\jojoserve\Debug\jojoserve.pdb" "C:\Program Files\Jojo\"

copy /Y "\\MyShare\Code\Projects\Jojo\UI\WHSAddIn\bin\Debug\HomeServerConsoleTab.Jojo.dll" "C:\Program Files\Windows Home Server\"

copy /Y "\\MyShare\Code\Projects\Jojo\UI\WHSAddIn\bin\Debug\HomeServerConsoleTab.jojo.pdb" "C:\Program Files\Windows Home Server\"

copy /Y "\\MyShare\Code\Projects\Jojo\UI\WHSAddIn\obj\Debug\Interop.jojoserveLib.dll" "C:\Program Files\Windows Home Server\"

REM *** register the new debug version of the service
"C:\Program Files\Jojo\jojoserve.exe" /Service

echo off
pause
An example debug session:
Now that you understand the general configuration and flow of Remote Debugging and how to connect the host and target systems, let’s run-through an example of the remote debugging process.
Build your project using Visual Studio
I recommend performing a full rebuild before a debug session. This will ensure you are running the latest code as well as getting the latest symbol and executable files.
Run your automated batch file to copy and register project files
Copy your project executable (.exe and .dll) and symbol (.pdb) files to the remote debugging system. Ensure they are all re-registered with the operating system if necessary (e.g. COM objects, Windows services). See above to view a sample batch file to assist with copying and registering files. Note, if you are debugging a native executable then you do not need to copy the .pdb symbol files to the remote system; native symbol files are only required on the local host system.
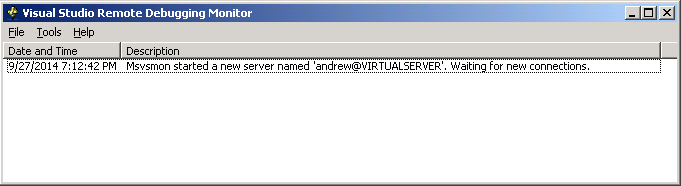
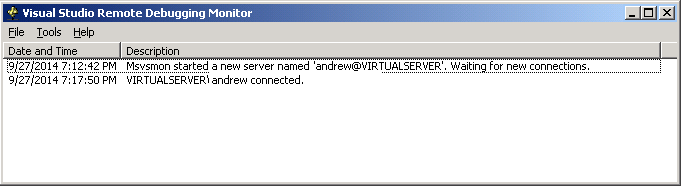
Launch the Remote Debugging Monitor utility on the remote system
Locate the Microsoft Debugging utility named msvsmon.exe which you copied to the remote debugging system during the one-time setup. Double click to launch the Remote Debugging Monitor.
Remote Debug Utility waiting for connection
The remote system is now waiting for a connection from your host system running the Visual Studio debugger.
Launch your application on the remote system
Launch your project executable on the remote system and return to your host system to establish the debug connection.
Attach the Visual Studio debugger on your host system to your running application on the remote system
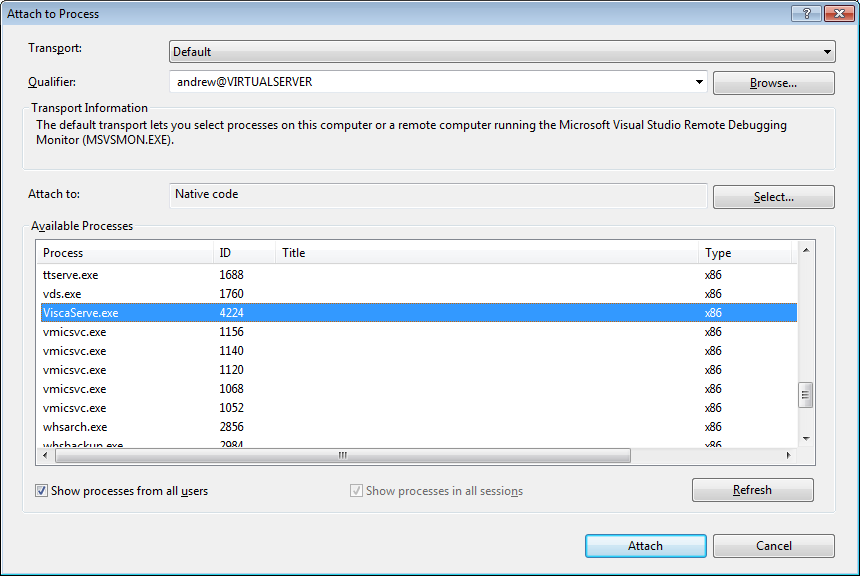
Return to the host system and open Visual Studio. From the main menu bar select Debug | Attach To Process…
Attach host to remote process
Select the following options to connect the Visual Studio debugger to the remote host:
Transport: set this value to “Default.”
Qualifier: this value specifies the name of the target debug system. Its full form is DOMAIN\USER_NAME@PC_NAME. If your local network uses a Domain then you must use the full syntax. If your local network does not use a domain then you can specify the name of the target PC (you can locate the PC name in the Remote Debugging Utility output window or via Computer | Properties | Computer Name). The user name is the name of the user logged into the remote system. You can find this name in the Remote Debugging Utility output window.
Remote debugging system connected to host
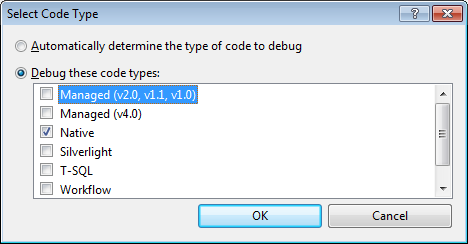
Attach To: press the Select button to specify the type of executable you are attaching to. For example, native, managed .NET 2x, or managed .NET 4x
Select the type of executable you are attaching to
Locate the name of the process you want to attach to. The Available Processes list-box will display all of the processes running on the target system specified in the Qualifier field
Select the process you have setup to debug on the remote system and press Attach. Visual Studio will then attach to the remote system and give you the ability to debug exactly like you would debug a local process. Very powerful!
Remote debugging system connected to host
As you can see, Microsoft Visual Studio offers a very powerful debugger allowing you to debug across multiple systems. Your first choice of debugging platforms will always be local but if that cannot be accomplished then rest assured, with a little bit of setup, you have access to the same debugging features across a remote system.
Tips:
Keep a copy of the Remote Debug Tools on a local server share for easy access. If you develop for multiple systems then you’ll need to access various versions (x86, x64, ARM) of the tools. Easy access and setup are key to a happy day
Use batch files or power-shell scripts to copy required files (exe, dll, symbols, etc) to the target PC and initialize your project requirements. If you create these scripts during your first debug session then you can use them as reference documentation in the future to easily recall which files are required to setup a debug session. Automating your development processes always make you more successful and less error prone
Each version of Visual Studio includes its own version of the Remote Debugging Utilities so if you develop products with multiple versions of Visual Studio then keep multiple copies of the utilizes stored on an easily accessible network share
Create an Administrator account on the target debugger machine with the same username and password that you use on your host development system. When remote debugging, log in with those credentials on the remote system. This makes the process of connecting your host and target much easier since you have the same account privileges on both systems
Save hard drive space on the remote debugging system when debugging a native application. Symbol files (.pdb) for native applications only have to exist on the host system while symbol files for managed applications (such as C#) must exist on the remote debugging system in the same folder as the application. Don’t copy large .pdb files to the remote debugging system for your native components
If you cannot create any break-points within Visual Studio after you have connected to your remote process then terminate the debug session (Debug | Terminate Process) then rebuild your project, copy all project and symbol files from your build to the remote system and reconnect the debugger. When attaching to the remote process, verify that you have the correct executable type (e.g. native, managed .NET 2x, managed .NET 4x, etc) set in the “Attach To” within in the Attach To Process box
An efficient and well-defined development environment is required for a software engineer to be effective. A major part of this environment is the testing/certification system (i.e. the Operating System available to install and test the software under development). Microsoft’s Hyper-V is a service which runs on 64-bit versions of Microsoft Windows Server and Windows 8.1 Pro. It is an excellent tool to enable a simple and effective test environment for software developers. Hyper-V virtualization services is a key part of my software development process. Below, I share how I setup, configure, and utilize the service for my everyday development and testing needs.
Pros:
not necessary to purchase new hardware
easy to reconfigure the operating system to a “clean” or “well defined” state for testing
able to share images of operating systems easily with other developers
faster setup and re-configure times
easy to roll-back to a previous state to get a fresh look at a software bug
Cons:
A 64-bit version of Microsoft Server (or Windows 8.1 Pro) operating system is required to install the host Hyper-V service
An Intel or AMD microprocessor with hardware-assisted virtualization must be available and configured by you in the BIOS
Requirements:
Windows Server 2008 or later, Windows 8.1 (64-bit) Pro/Enterprise
A x64-based processor (64-bit)
A BIOS with hardware-assisted virtualization. This is available in processors that include a virtualization option such as Intel Virtualization Technology (Intel VT) or AMD Virtualization (AMD-V)
A BIOS with hardware-enforced Data Execution Prevention (DEP) must be available and be enabled. Specifically, you must enable the Intel XD bit (execute disable bit) or AMD NX bit (no execute bit).
The first requirement to utilize Hyper-V is to install the host service on your Windows Server or Windows 8 Pro/Enterprise system. This is a one-time setup as described below.
Enabling Intel VT or AMD-V in the BIOS:
Enabling the Intel Virtualization Technology (Intel VT) or AMD Virtualization (AMD-V) feature in your processor via the BIOS is required to run Hyper-V. Unfortunately, not all processors have this feature. If the processor in your host system does not have this feature then you can either purchase a new processor or use a different virtualization host such as Virtual Box which does not require hardware virtualization. To verify that your processor’s Virtualization Technology is enabled, restart your PC and enter the BIOS menu (note: there is no common PC BIOS or BIOS interface so you should refer to your motherboard/CPU documentation for detailed information about your specific system). Enter the BIOS as your system is restarting (typically press the Delete, F1, ESC, or Alt-F4 keys). Once you’re in the BIOS menu look for a setting title Intel Virtualization Technology or VT-x. This could be under the Advanced CPU, Chipset, Advanced, or Other sub-menu. Make sure the setting is Enabled and save the BIOS settings and restart your system. If you can’t locate the setting you can simple try installing Hyper-V. If the virtualization feature is enabled (as it would be by default with most modern AMD processors) then Hyper-V will work fine. If the feature is NOT installed then you will get a warning during installation and you will not be allowed to continue until the virtualization feature is enabled.
Installing Microsoft Hyper-V services on Windows Server:
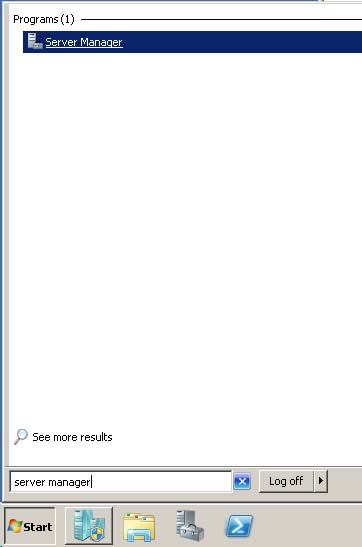
From the Windows Start Menu, search for the Server Manager and launch it
launch the server manager
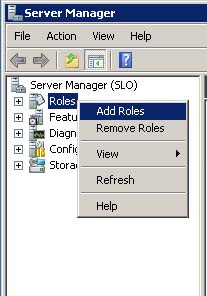
In the Console Tree on the left-side, right-click Roles and select Add Roles. .
select add roles
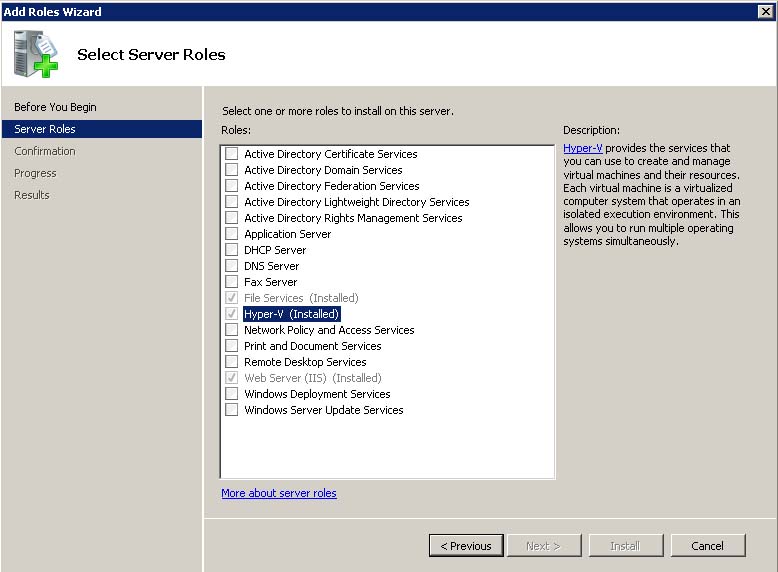
The Add Role Wizard will be displayed. Click-though the wizard and select Hyper-V from the Select Server Roles page. If Hyper-V is already installed then simply click the Cancel button and move along to the next section. Otherwise, press the Install button and click-through the Confirmation and Progress pages to complete the installation
add role wizard
Installing Microsoft Hyper-V services on Windows 8.1:
In the Control Panel, click Programs, and then click Programs and Features. Click Turn Windows features on or off. Click Hyper-V, click OK, and then click Close.
Launching the Hyper-V Console:
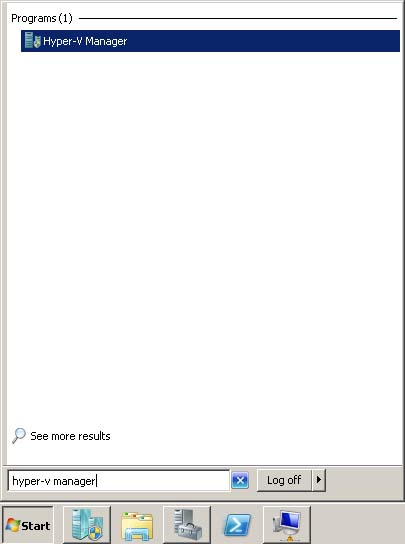
From the Windows Start menu, search for the Hyper V Manager and launch it
launch hyper-v manager
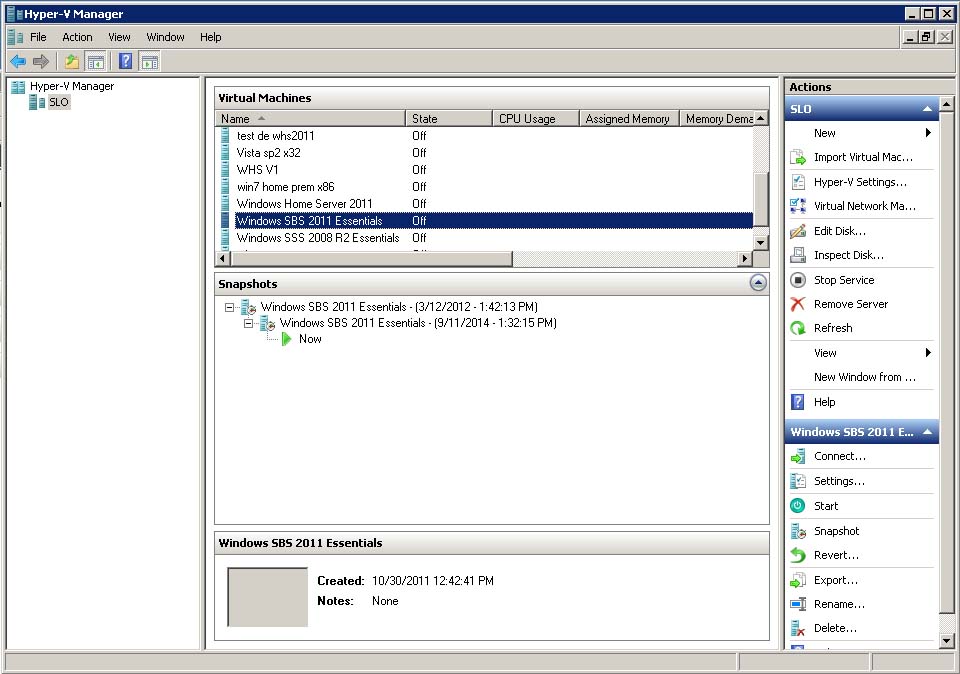
When you launch the Hyper-V manager you will see a list of all current virtual machines (guest operating systems) that you have created. Selecting a virtual machine from the top-center view will display a list of each of the snapshots you have created for that virtual machine.
hyper-v manager view
Your view of virtual machines will be empty if this is the first time you have run the Hyper-V manager.
Creating a new virtual machine:
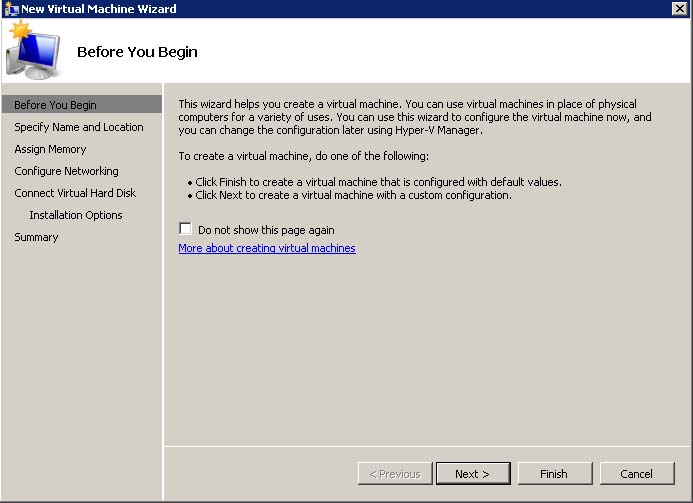
In the Actions pane located in the upper-right select New | Virtual Machine. The New Virtual Machine wizard will be displayed.
hyper-v wizard – startup
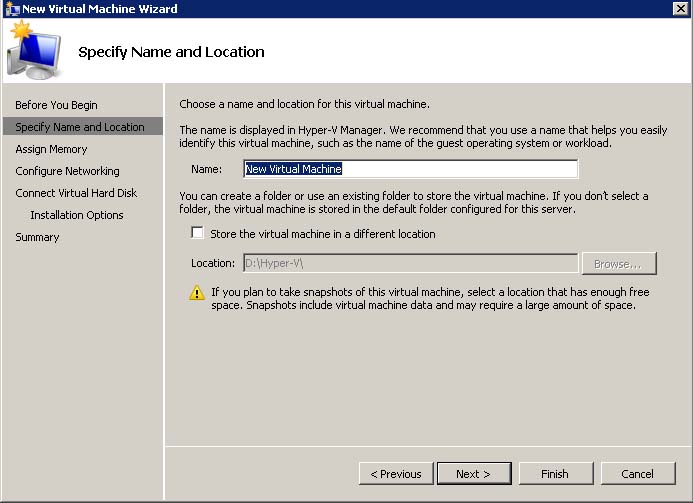
Click Next and enter a description of your new Virtual Machine such as “Windows Server 2012 Essentials” or “Windows 8.” Click Next to configure the amount of memory accessible to the virtual machine.
hyper-v wizard – VM name
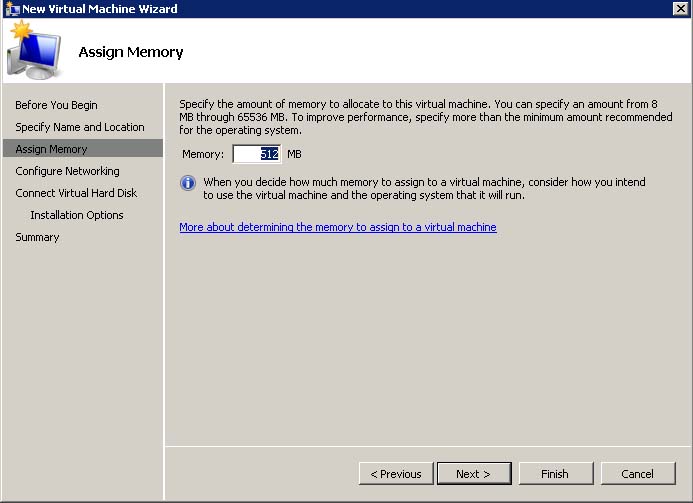
Enter the amount of memory you want the guest operating system in you new virtual machine to have access to. Note this physical memory must exist in the host system running Hyper-V. So you should make this value only as large as you actually need. Make sure you take into account the actual amount of RAM required by the operating system you are going to install in the virtual machine (for example Windows Small Business Server 2011 requires a minimum of 1024 MB). You can always change this value later so don’t be too concerned about absolute requirements or optimizations for your system at this time. Click Next to configure your network.
hyper-v wizard – configure memory
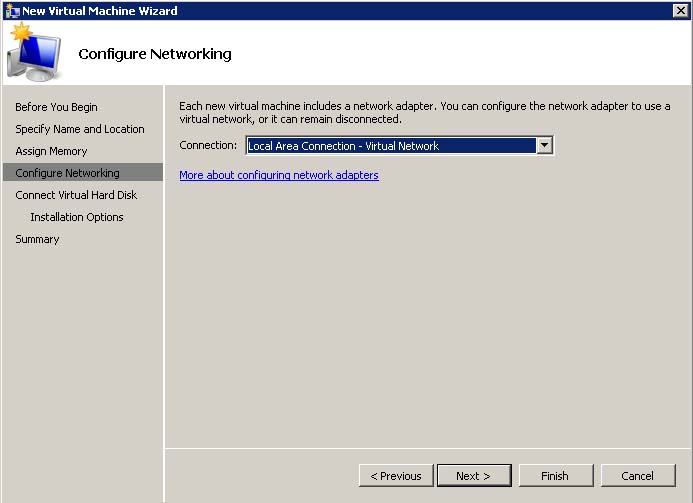
Configure the network you want the guest operating system to have access to. It’s best to select the LAN. Doing so will allow the installed guest operating system to appear on your local network just like a normal physical system. You will have access to file sharing, internet access, and (most important to us developers) remote debugging features. Click Next to configure the size and location of the virtual hard drive.
hyper-v wizard – configure network
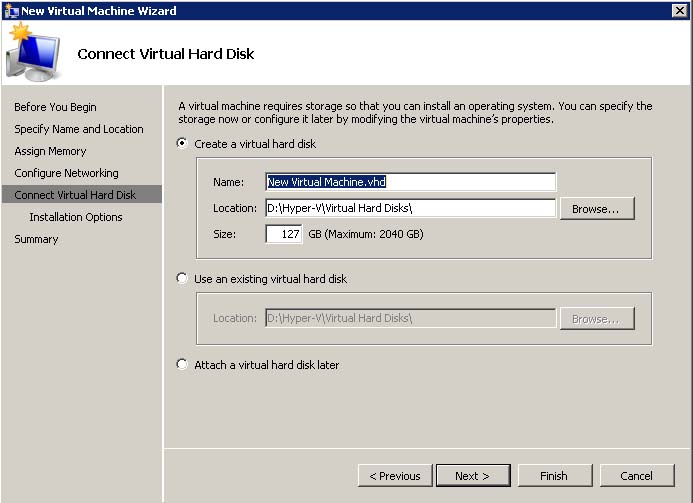
Enter a name for your new virtual machine. It will always have the file extension vhd. You should name it something relevant so you will be able to match the vhd file with the operating system you install within the virtual machine. For example, if I create a virtual machine named, “Windows 2012 Server Essentials” then I would name the virtual machine something like, “ws2012essentials.vhd” so I can immediately identify the vhd file when exploring the Windows file system. Enter the location of your new virtual machine. I prefer to save all virtual machines on a secondary data drive away from the Windows operating system drive of the Hyper-V host not only for easier storage management but also a slight boost in efficiency by reducing the amount of hard drive seeks between both the Hyper-V host and the virtual machine. But you can place the vhd files where ever you prefer as long as there is enough space on the hard drive. Enter the size in Gigabytes of the virtual hard drive. The best size is dependent on the guest operating system you install in the virtual machine. There’s quite a bit of trial and error to get this value just right for your needs. I recommend leaving the default value of 127GB. You can increase size of the virtual hard drive later if you need. Press Next to configure the guest operating system and attached CD/DVD devices.
Finally, locate the iso file containing the operating system you want to install into your new virtual machine. You can download iso files directly from Microsoft’s MSDN site. This iso file will be mounted in the virtual machine as a CD/DVD device an allow you to install the operating system on the first boot of the virtual machine. Press Next to view the final settings of the new virtual machine.
hyper-v wizard – configure guest operating system
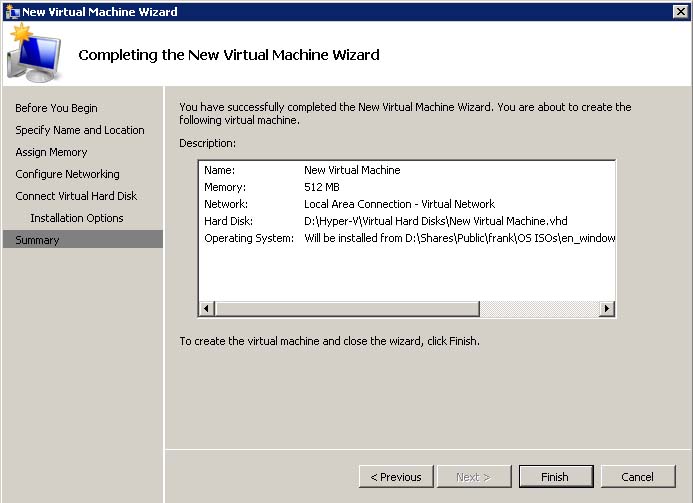
If all your virtual machine settings look okay then click Finish to finalize the process. A new virtual hard disk will be created with the name you specified in the folder you specified. Return to the Hyper-V manager and you will see the name of your new virtual machine in the Virtual Machines pane located in the top-center of the window.
hyper-v wizard – verify final settings
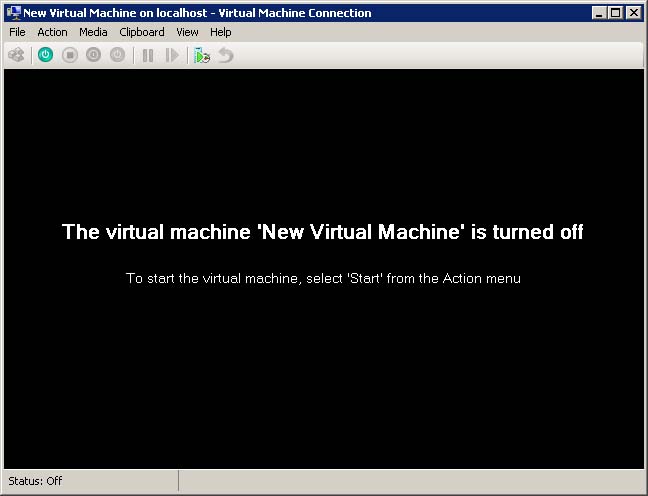
Now your new virtual machine is setup and you can install the operating system into it. Double-click the virtual machine within the Hyper-V manager to start it. You will see the virtual machine starts in a disabled state.
hyper-v first launch
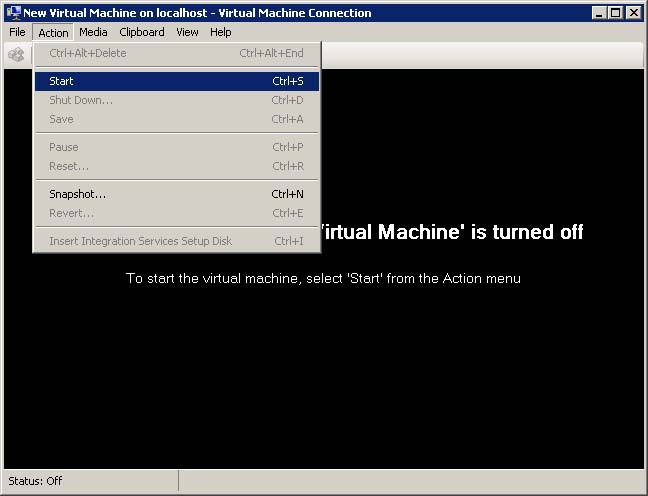
From the virtual machine select Action | Start to launch the install process of the new virtual machine.
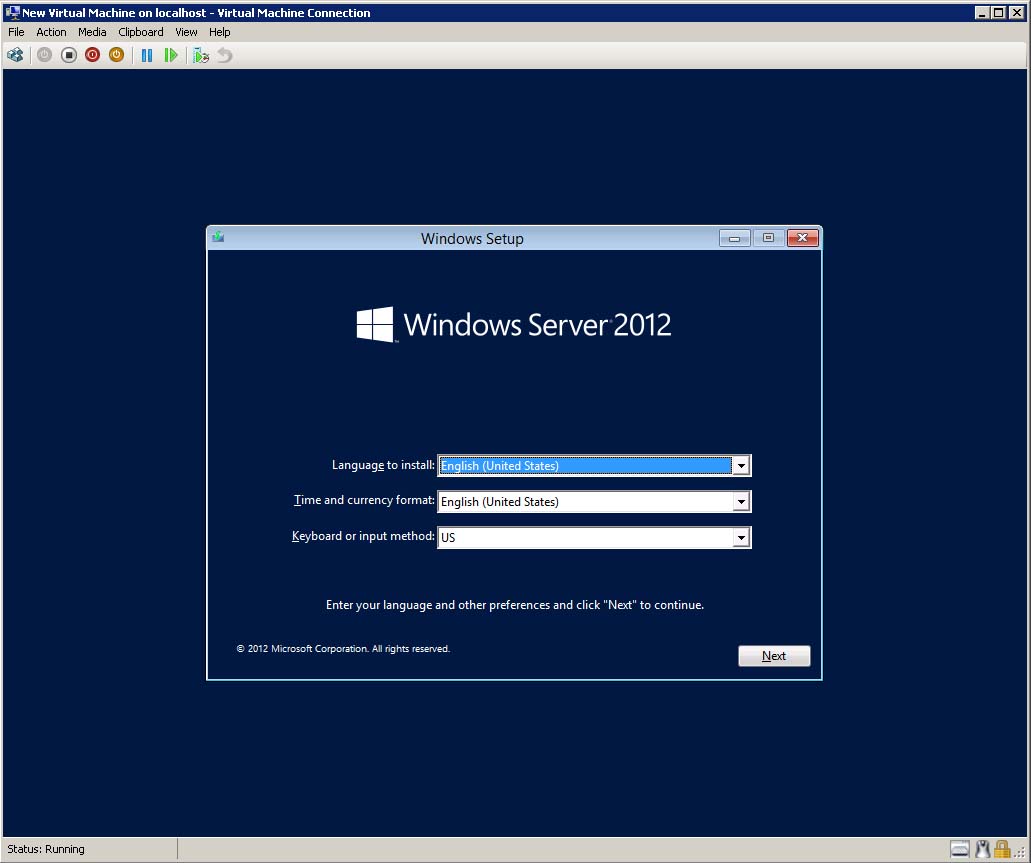
hyper-v install guest OS
Now the install process will begin loading directly from the iso file you specified when creating the virtual machine. Finish the install process just like you would on any machine any you are done.
hyper-v install OS
Launching a virtual machine:
After you have created one of more virtual machines you can launch them directly from the Hyper-V Manager. Double-click the virtual machine from the Virtual Machine pane located at top-center then click Action | Start.
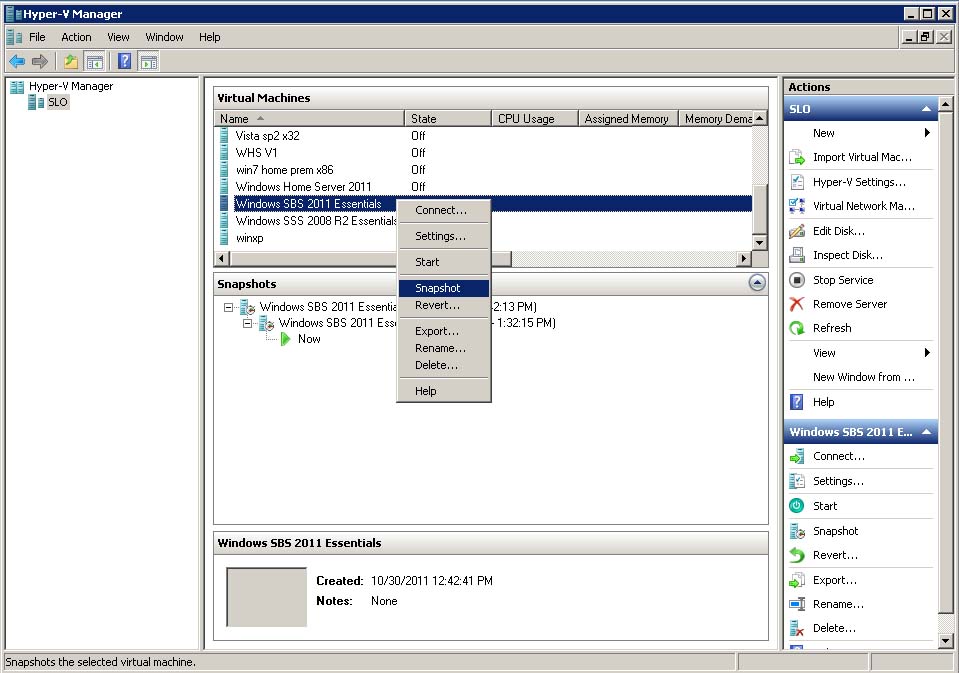
Creating and utilizing snapshots:
Snapshots give you the ability to freeze an operating system at a point in time. This is perfect for testing before-and-after issues and compatibility with other software. To create a new snapshot for a virtual machine select the virtual machine from the Virtual Machines pane, right-click and select Snapshot.
hyper-v snapshot
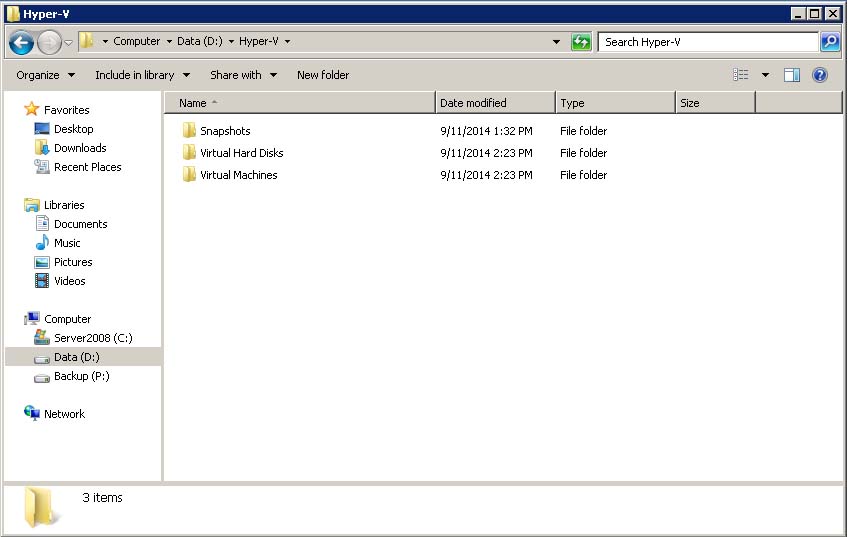
Managing virtual machine images:
It’s best to manage your virtual machines directly through the Hyper-V Manager. You can create, edit, and delete directly through the manager’s user-interface. With that, it’s good to know that all virtual machines, virtual hard disks, and snap shots are stored on a local hard drive on the Hyper-V host system. You can locate this folder via Windows Explorer. Open an Explorer window to the folder you specified during the virtual machine creation wizard. For example, in my case I save all virtual machine files on a data drive D:
hyper-v explore
Tips and tricks:
Backup your virtual machine image files. Be aware of the folder containing the virtual machine, virtual hard drive, and snap shot files. If you don’t run an image backup on your Hyper-V host machine then make sure you backup those specific folders. Regenerating all your virtual machines would not be fun!
Create a snapshot immediately after installing a new operating system on your virtual machine. The ability to rollback to a “clean” system will be helpful at some point trying to track-down a bug
Install the Hyper-V host on the most powerful and memory-filled system you have available. Each virtual machine will gobble memory from the host so if you want to run multiple virtual machines simultaneously you’ll need more RAM. Also, a multi-core CPU is much more friendly to running virtual machines.
Create a library of virtual machines with all the operating systems you develop for. Have them available at a moments notice for quick efficient testing of your code. If your product supports all the way back to Windows XP then so should your VM library.
Share virtual machine images with other developers. Unlike physical hardware which might not always be compatible, you can share some, or all, of your VM library with other developers in your company. As long as they use Hyper-V it’s all good. When creating a new library you can divvy up the work, save time, helping each other build a VM library.
Add multiple languages to your VM library. We’ve all seen some bugs which are only reproducible in certain languages. Add some Japanese, German, and other native VM’s to your library based on the target audience of your software.